DisplayLink macOS English Instructions
DisplayLink Manager – macOS Installation Instructions
See here for a more extensive users guide for the Triple 4K Display Docking Station.
Be sure to use direct cables (HDMI-to-HDMI, DP-to-DP) when connecting external displays to the Triple 4K Display Docking Station.
Please download DisplayLink Manager Software directly through the Synaptics website for the latest version available: (DisplayLink Manager Software).
1. Select the correct operating system you will be using with DisplayLink software from the list of supported systems
 2. Select “DOWNLOAD” and then “Accept” after reading and accepting the Software License Agreement. The .PKG file should be downloaded to your computer downloads folder.

3. Locate and double-click on the downloaded file to begin the application installer.

4. Beginning with the ‘Introduction’ portion of the installer, select ‘Continue’ to move forward with the installation process:

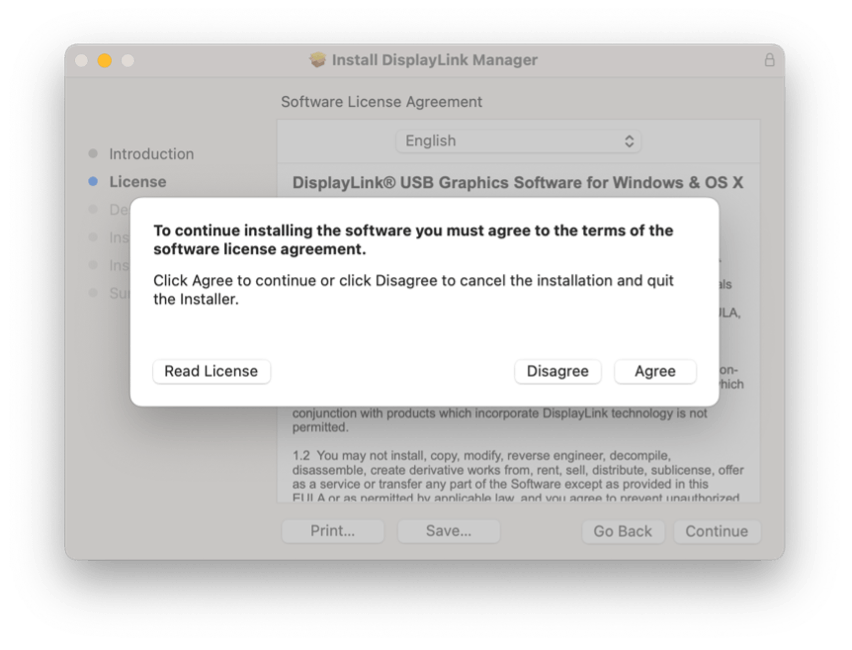
5. After going over the license information from the ‘License’ section of the application installer, select ‘Continue’:

6. Click on the ‘Agree’ button to comply with the software license agreement.

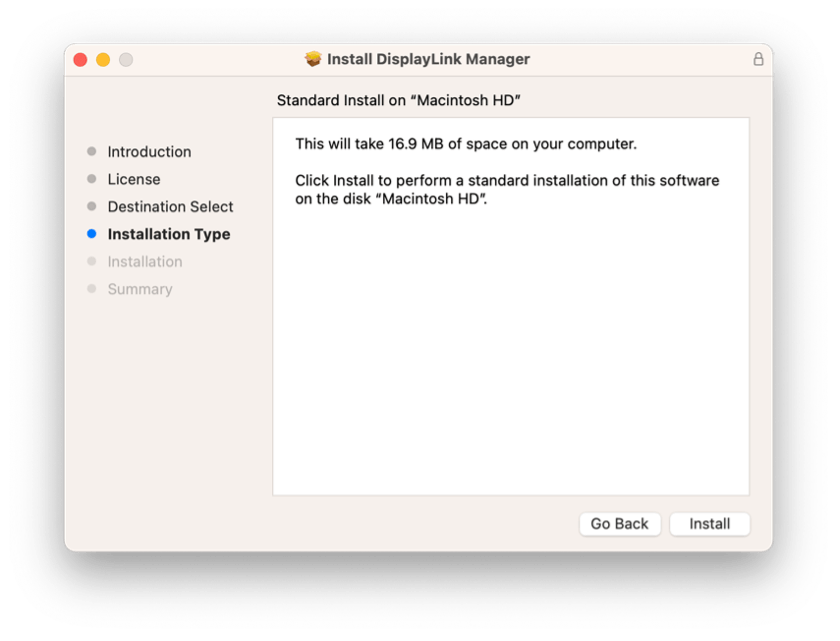
7. Moving onto the ‘Installation Type’ section of the application installer, click on the ‘Install’ button:


11. Once the application installation is finished, please connect your DisplayLink device to your Apple computer/device.
12. Once the device is connected, macOS will notify you that the ‘DisplayLink Manager’ application would like to record the computer’s screen. Click the ‘Open System Preferences’ button to grant this access.

13. The ‘Security & Privacy’ application will open, with the default view showing the ‘Privacy’ tab with the ‘Screen Recording’ option selected by default:

14. For macOS 12 and older, click on the gold padlock at the bottom of the application window to enable changes.
15. If prompted, enter your password, and select ‘Unlock’:

16. Click to toggle on the switch next to the DisplayLink Manager entry:

17. You will be prompted to Quit and Reopen the DisplayLink Manager application for the change to take effect. Please do so:

18. Once this change is complete, the displays connected to your DisplayLink based product will start working automatically.
** Please keep in mind - The DisplayLink Manager Application does NOT and will NOT record or store
any information whatsoever. This permission must be granted in order for the DisplayLink Application to access the information it needs in order to generate the image shown on the
DisplayLink-connected displays. **
19. Select the DisplayLink Manager Application icon that is now available at the top of your screen within the Apple menu. This will unveil the DisplayLink Manager Application status window:

20. Within the DisplayLink Manager Application status window, next to the ‘Automatic startup’ section, click to place a checkmark next to the ‘Launch automatically after login’ option. This will help to ensure that the DisplayLink application will be started each time you start your Mac.

21. To receive notifications from macOS while a DisplayLink device is connected to your Mac, you must edit/alter the ‘Notifications & Focus’ System Preferences application.
Click on the ‘System Settings’ icon (which looks like a gear) within the macOS Dock at the bottom of your screen; click on the ‘Notifications’ section.
22. Within the ‘Notifications’ tab, next to the ‘Allow notifications’ label, click to switch the toggle next to the ‘When mirroring or sharing the display’ option. This will allow you to receive notifications from macOS while the DisplayLink device is connected.

23. Once all of the previous steps are complete, the installation process is now finished.

